Audio Generation with Mamba using Determined AI
Training the new Mamba architecture on speech + music data!

As you might have noticed from my past blogs, most of my experience is in computer vision. But, recently, for obvious reasons (read: ChatGPT, LLaMas, Alpacas, etc...), I realized it's about time I learn a thing or two about how transformers work. About 2 seconds deep into transformers literature, boom! Another foundational architecture was released (who's surprised though?). It's called Mamba, and I decided I wanted to learn about it through practice. In this blog, we'll go through what Mamba is, what makes it different from transformers, what it's capable of, and some lessons learned from reproducing an open source speech synthesis script using Mamba. Let's go!
If you want to jump straight into the code, here's the GitHub link.
What is Mamba?
How is Mamba Different than Transformers?
As you may already know, GPTs and are based on the Transformer architecture, whose main component is the Attention module. This module computes the relationship of all tokens relative to all other tokens in a sequence, which allows for transformer-based models to understand context very well.
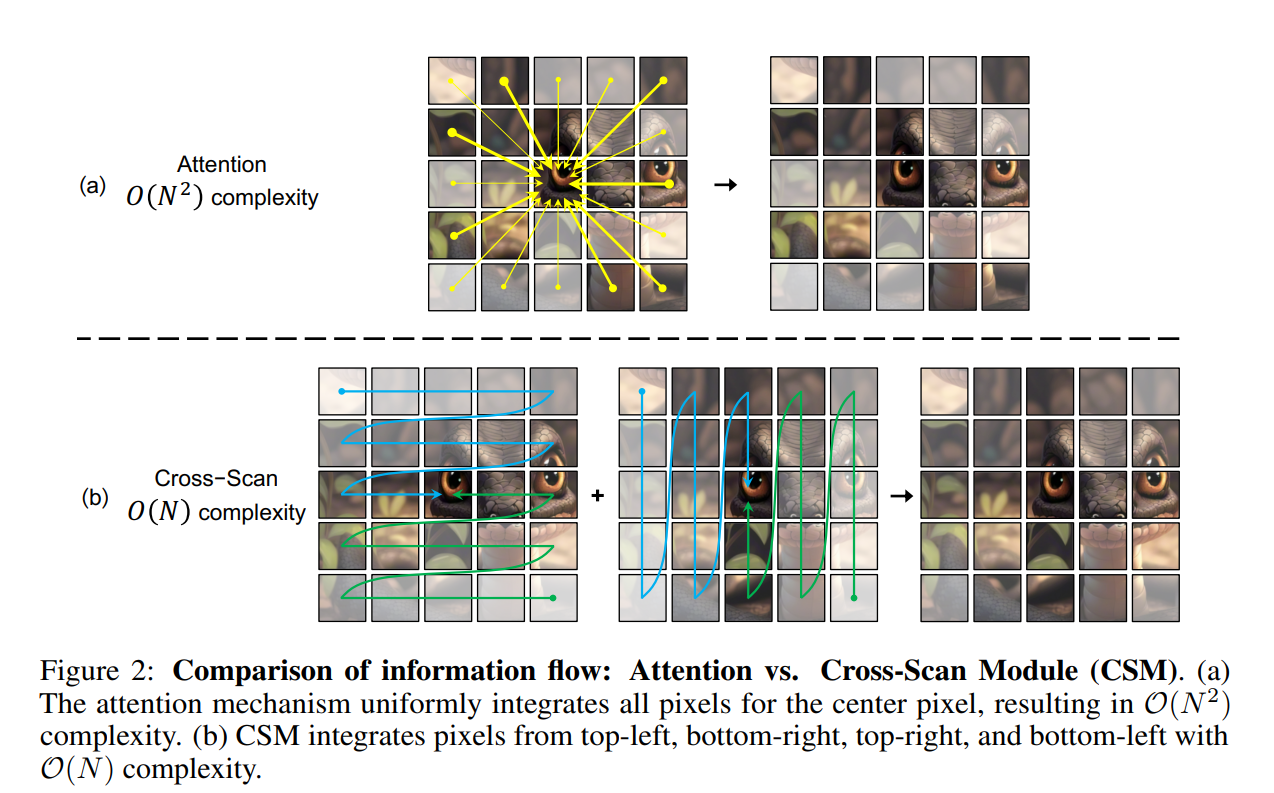
Mamba, however, is based on State-Space-Models (SSMs), which are linear by nature. How does Mamba achieve the same context understanding, in a linear fashion?
See the diagram below where the image (treated as an input sequence) is processed in 4 directions: bottom-left to top-right, top-left to bottom-right, etc. The results of these 4 computations are integrated together to achieve the same result as the Attention module, making Mamba super efficient.
What can Mamba do?
Just like Transformers, Mamba is an architecture built for handling sequences. This includes:
Language modeling
Genome Sequence Modeling
Audio Modeling
What's different about audio vs. text generation?
In terms of training the model, not much. The paper states that they use the exact same training recipe for training language models as they do for training audio models (and DNA sequence models). This is called next-token prediction, which sits within a larger umbrella called autoregressive language modeling:

However, the preprocessing steps might be a little different. I wasn't able to find preprocessing details, like what normalization and tokenization schemes they used, in the Mamba paper. The script explored in this blog, though, uses the SpeechTokenizer library to capture both semantic and acoustic tokens, while other audio tokenizers might only capture one or the other. You wouldn't want to use this library for a text generation model though, so that's one difference between the two tasks.
How it works
This project is entirely based on MarcRandBot: a project that initializes a 12M parameter Mamba model, establishes normalization + tokenization steps and a training scheme, and trains that model on a Marc Randolph YouTube video. I simply experimented with this script, and in the process, changed a couple of aspects:
The libraries used for preprocessing and for experiment tracking + visualization (moviepy --> ffmpeg, WandB --> Determined AI).
The training dataset.
Here I'll go through a brief overview of how the code works. A more detailed explanation + design choices are in the original blog post.
Steps
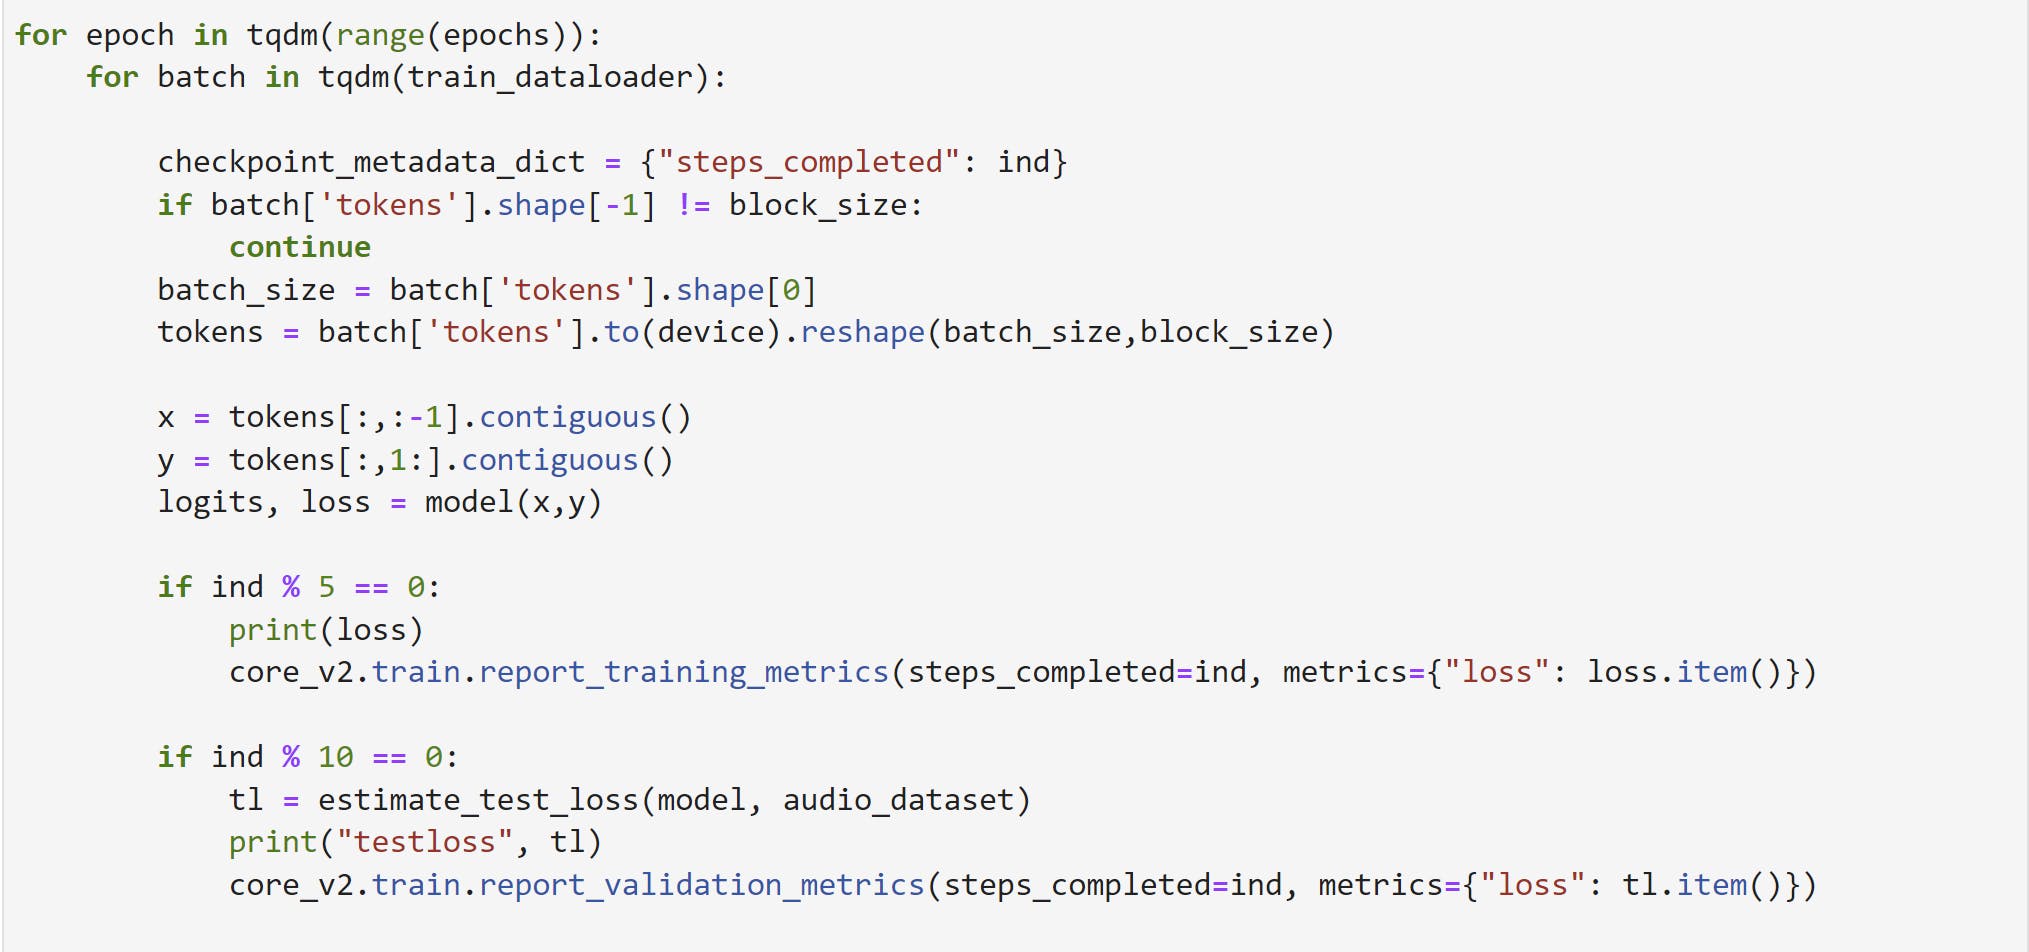
Download data in .mp4 and split into 10s .wav files
Normalize + tokenize the dataset
One important consideration is setting the number of quantizers when tokenizing the waveforms. A lower number of quantizers might result in a poor tokenization, not capturing enough of the essence of audio samples (example below). A higher number of quantizers results in cleaner tokenization, but setting the number of quantizers too high can lead to the model underfitting, or not being able to capture all the nuance. It's best to experiment with the number of quantizers to see what best captures the essence of the audio while matching the size of your model. 4 quantizers worked best for me.
Train model
Here, the only things you need to decide are your standard hyperparameters: learning rate, # of epochs, etc. In most cases, I continued training well past the point of the model overfitting due to better sounding audio despite the overfitting. This was also mentioned in the original Mamba paper in the Speech Generation section of the appendix: the authors saw "automated metrics of generated samples continually improving throughout training" despite significant overfitting on a small dataset. Since the goal was to just generate correct sounding audio, even if not actual English, this seemed to be a valid approach.
Test model
This consists of downloading checkpoints and trying them out. You can either:
generate audio unconditionally (without a seed sequence), or
have the model complete the audio given a test sample from the dataset.
Empirically, both worked out similarly for me, although the original blog mentions the second way resulting in better audio. Try it out for yourself, and let me know what you think!
Experiments
Something you never get tired of hearing as a machine learning engineer is, "it's all in the data". But somehow each time I take on a new ML project, I have to re-learn this the hard way 😅.
I started out wanting to have the model produce audio sounding like Schmidt from New Girl, similar to the Marc Randolph example in the blog. However, I quickly realized that wouldn't be very easy to do due to data issues. In this part of the blog I'll explain each of the datasets I trained the model on, what motivations I had for pivoting to each one, and what each of the results sounded like.
1)10-20 min compilations of Schmidt's dialogues from New Girl
Motivation: Have the model output audio that sounds like Schmidt.
Problems: The main problem with this was the size of the dataset. It was too small, so the model overfit.
Results: Garbage output or memorized output (sounding exactly like lines that were in the training data).
Click the links below to listen:
2)4 hour compilation of Taylor swift music
Motivation: I chose this because I needed a lot more audio of just one person's voice. Plus, it was hard to find non age-restricted data, which is required for the audio download to work. Also, this was a gamble into finding out whether this approach would work for music.
Problem: Even setting the number of quantizers to 8 wasn't able to result in a good tokenization. I later found out that the SpeechTokenizer discards music altogether, which makes a lot of sense. Listen to it below:
🎙️ Taylor Swift Tokenized 8 Quantizers
Result: garbage in, garbage out. Listen to the below at your own risk:
3)1 hour of AI generated Morgan Freeman telling a bedtime story
Motivation: Very clean audio, and a decent amount of it.
Problem: AI Morgan Freeman pauses a lot in the original video. So the outputs were mostly empty:
I didn't even bother training a model on this because most of the test samples were more than half empty, like this one.
4)4 hour long Alice in Wonderland audiobook
Motivation: I finally settled on this because it's a very long, relatively clean, audio dataset.
Problems: No obvious problems.
Result: Audio that actually sounds like the input! You can tell that it's not memorized because a lot of it doesn't even sound like English. I did get some good English sounding output though:
🎙️ Alice in Wonderland 4 quantizers result
I actually tried 2 version of this, one utilizing a dataset tokenized with a 8 quantizers and another with 4 quantizers. Here are the training graphs for both approaches:
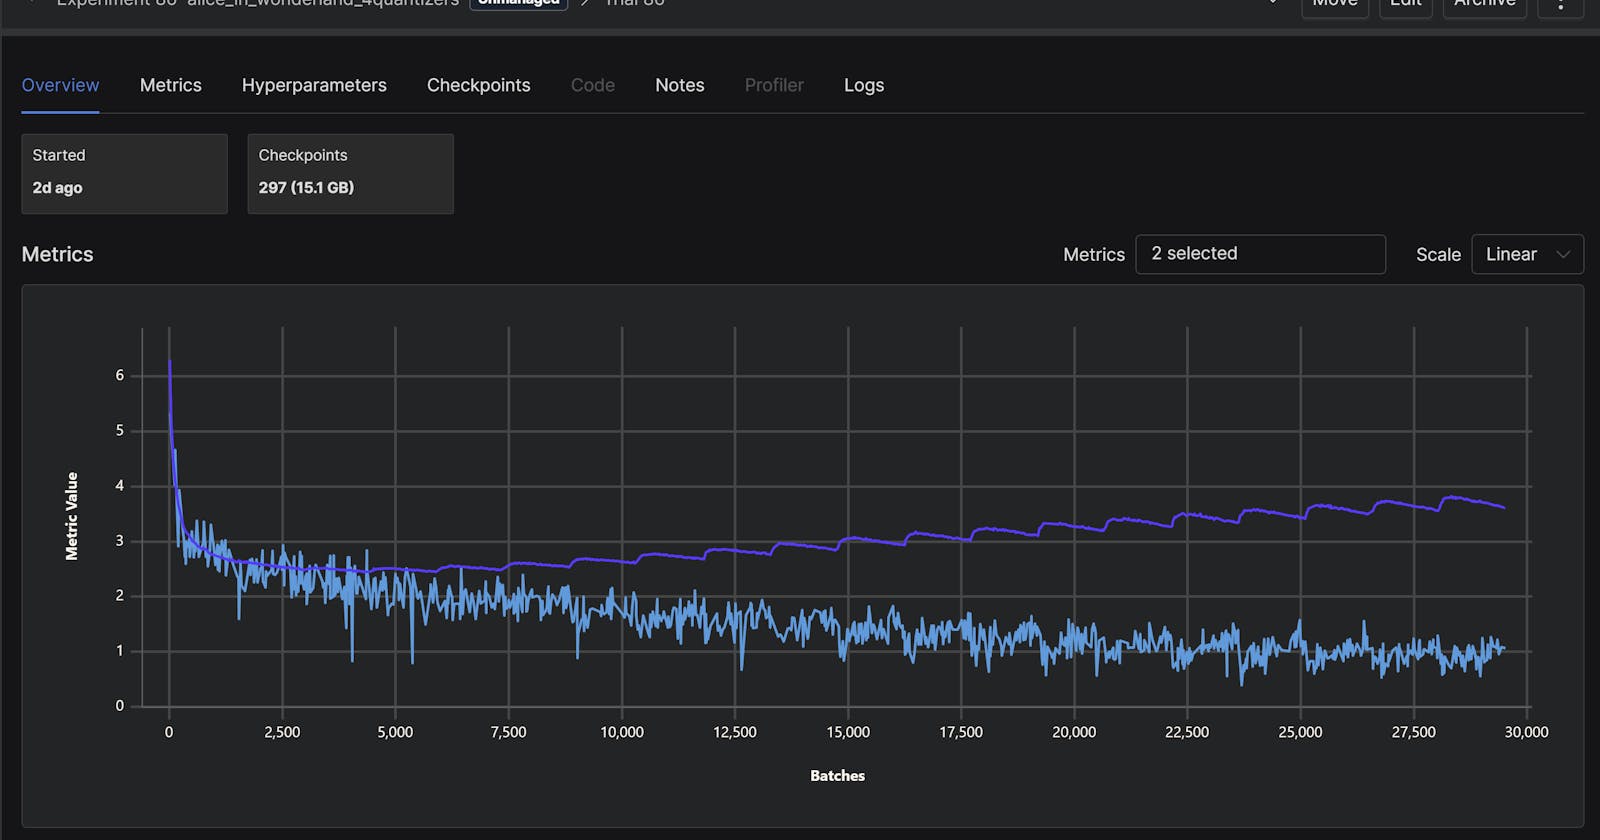
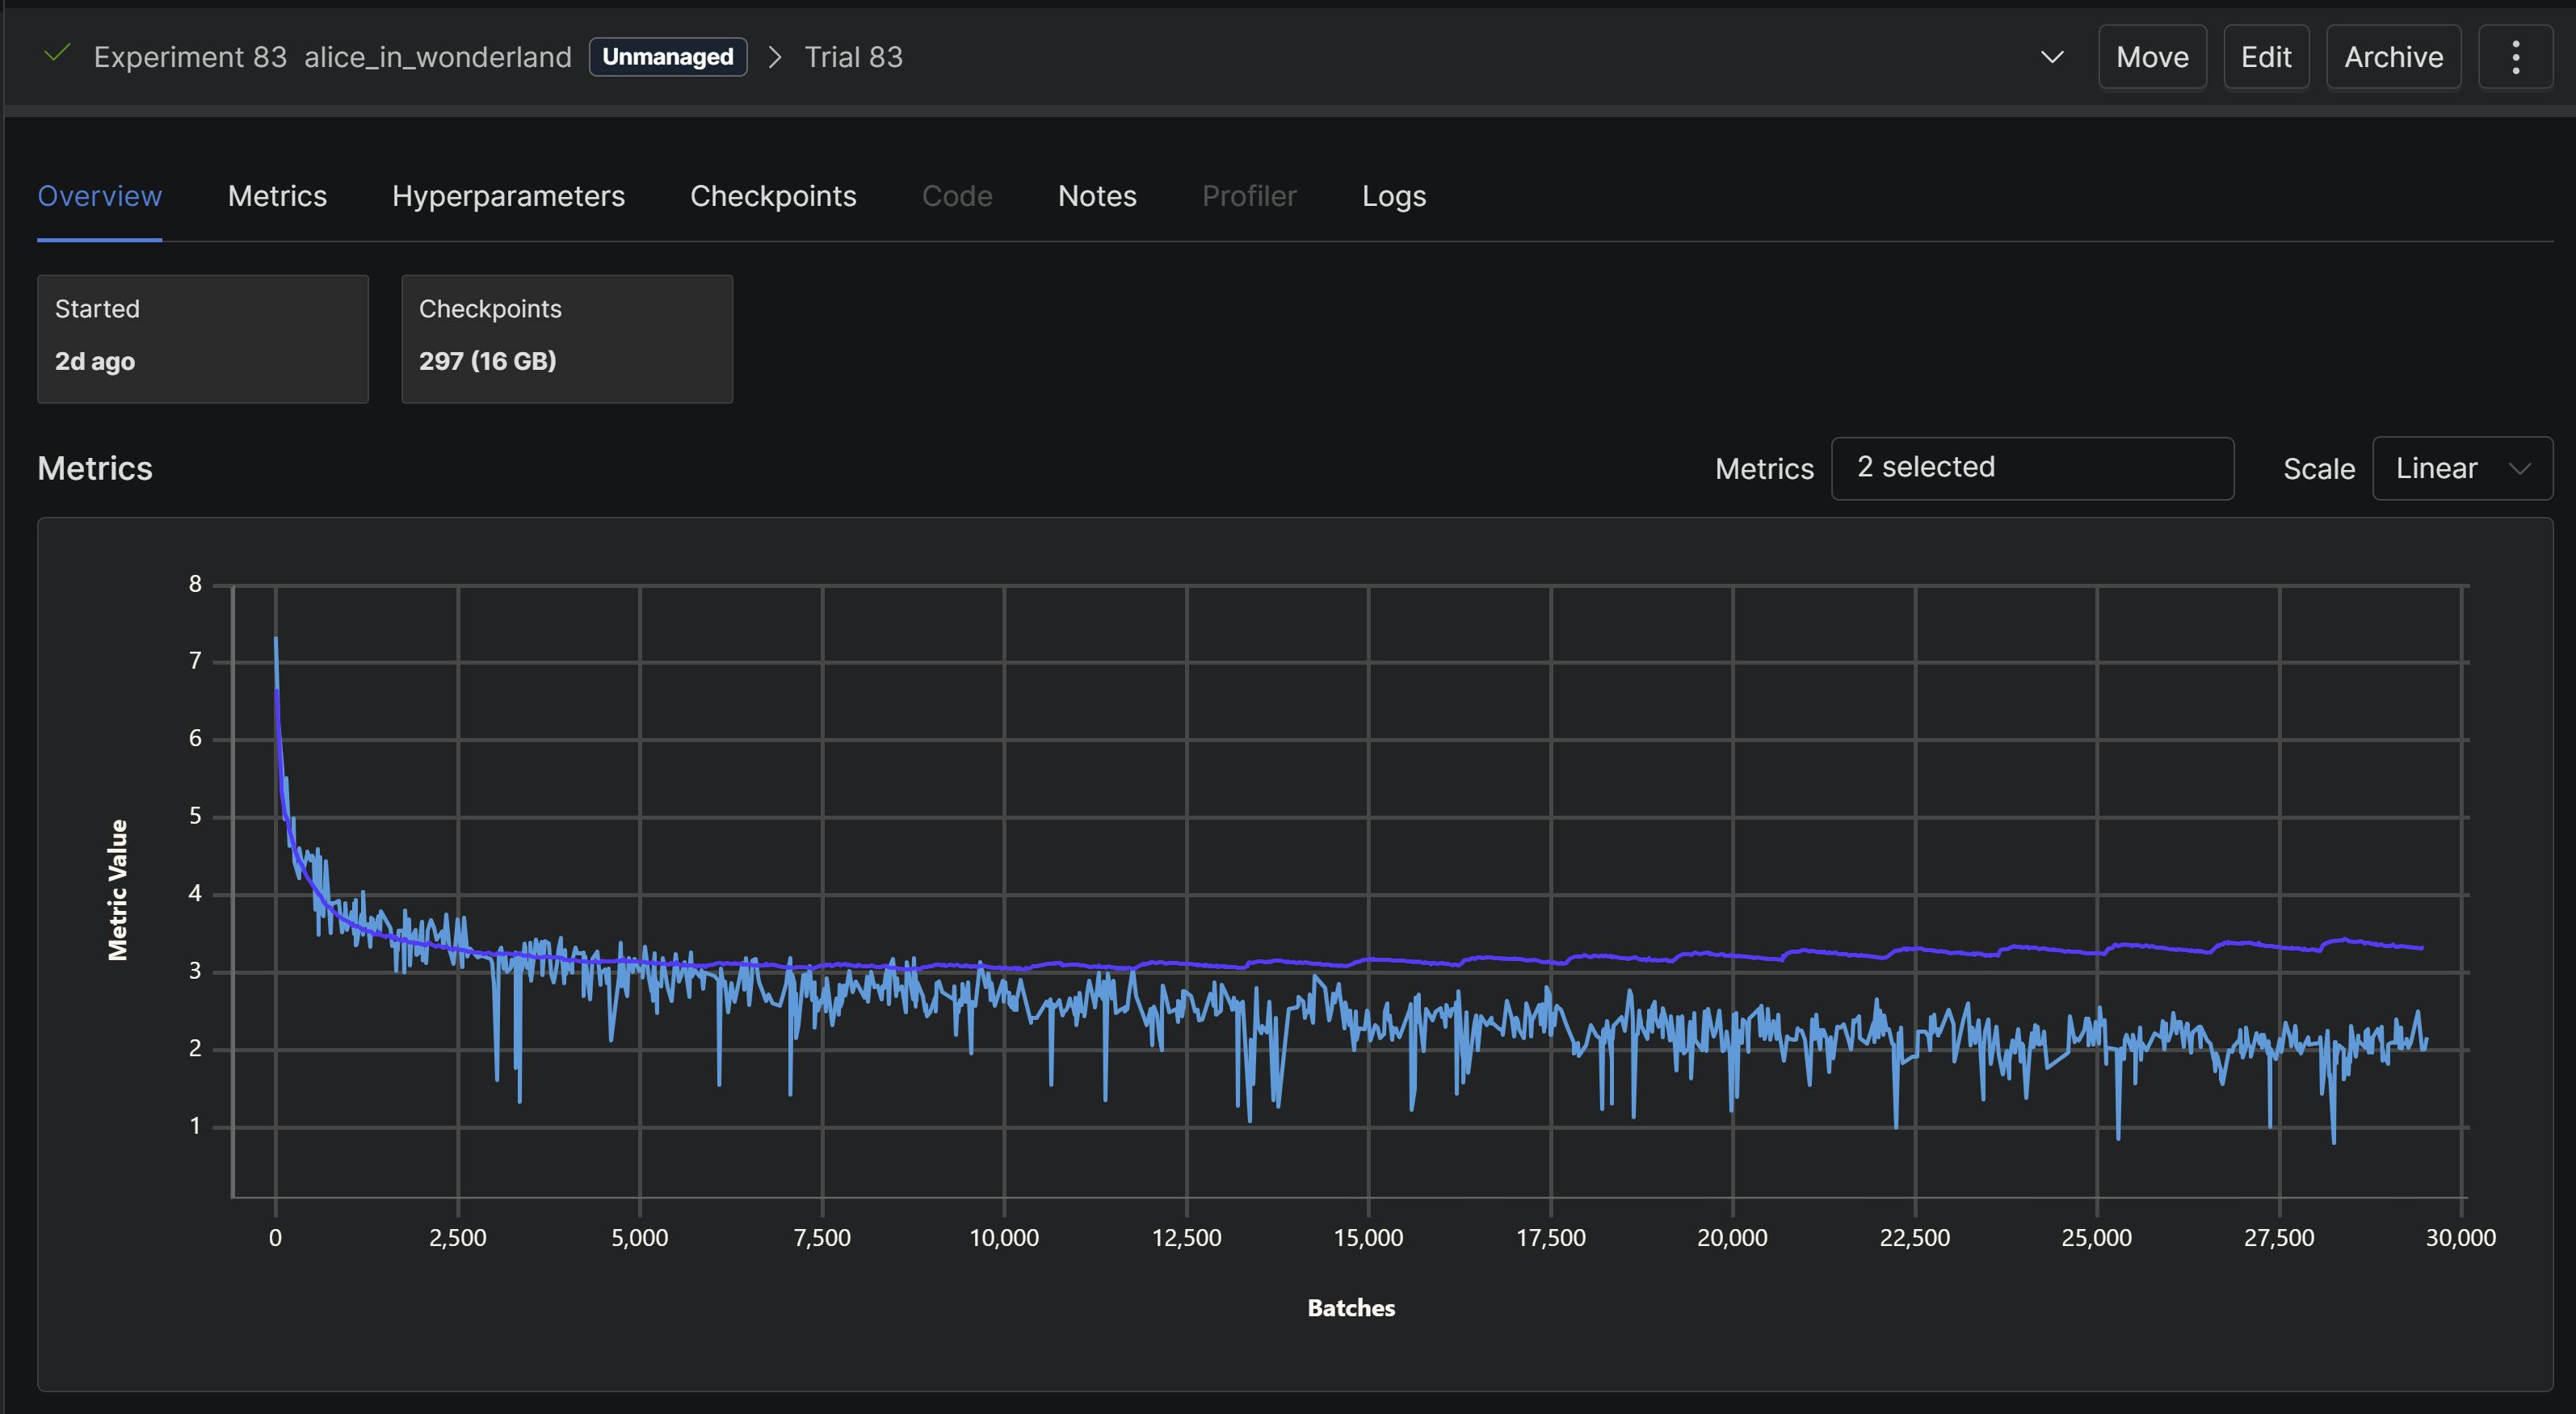
8 quantizers (notice how the training loss, in blue, never goes below 2, likely because the input samples were still too noisy):
4 quantizers (notice how the training loss finally approaches 1):
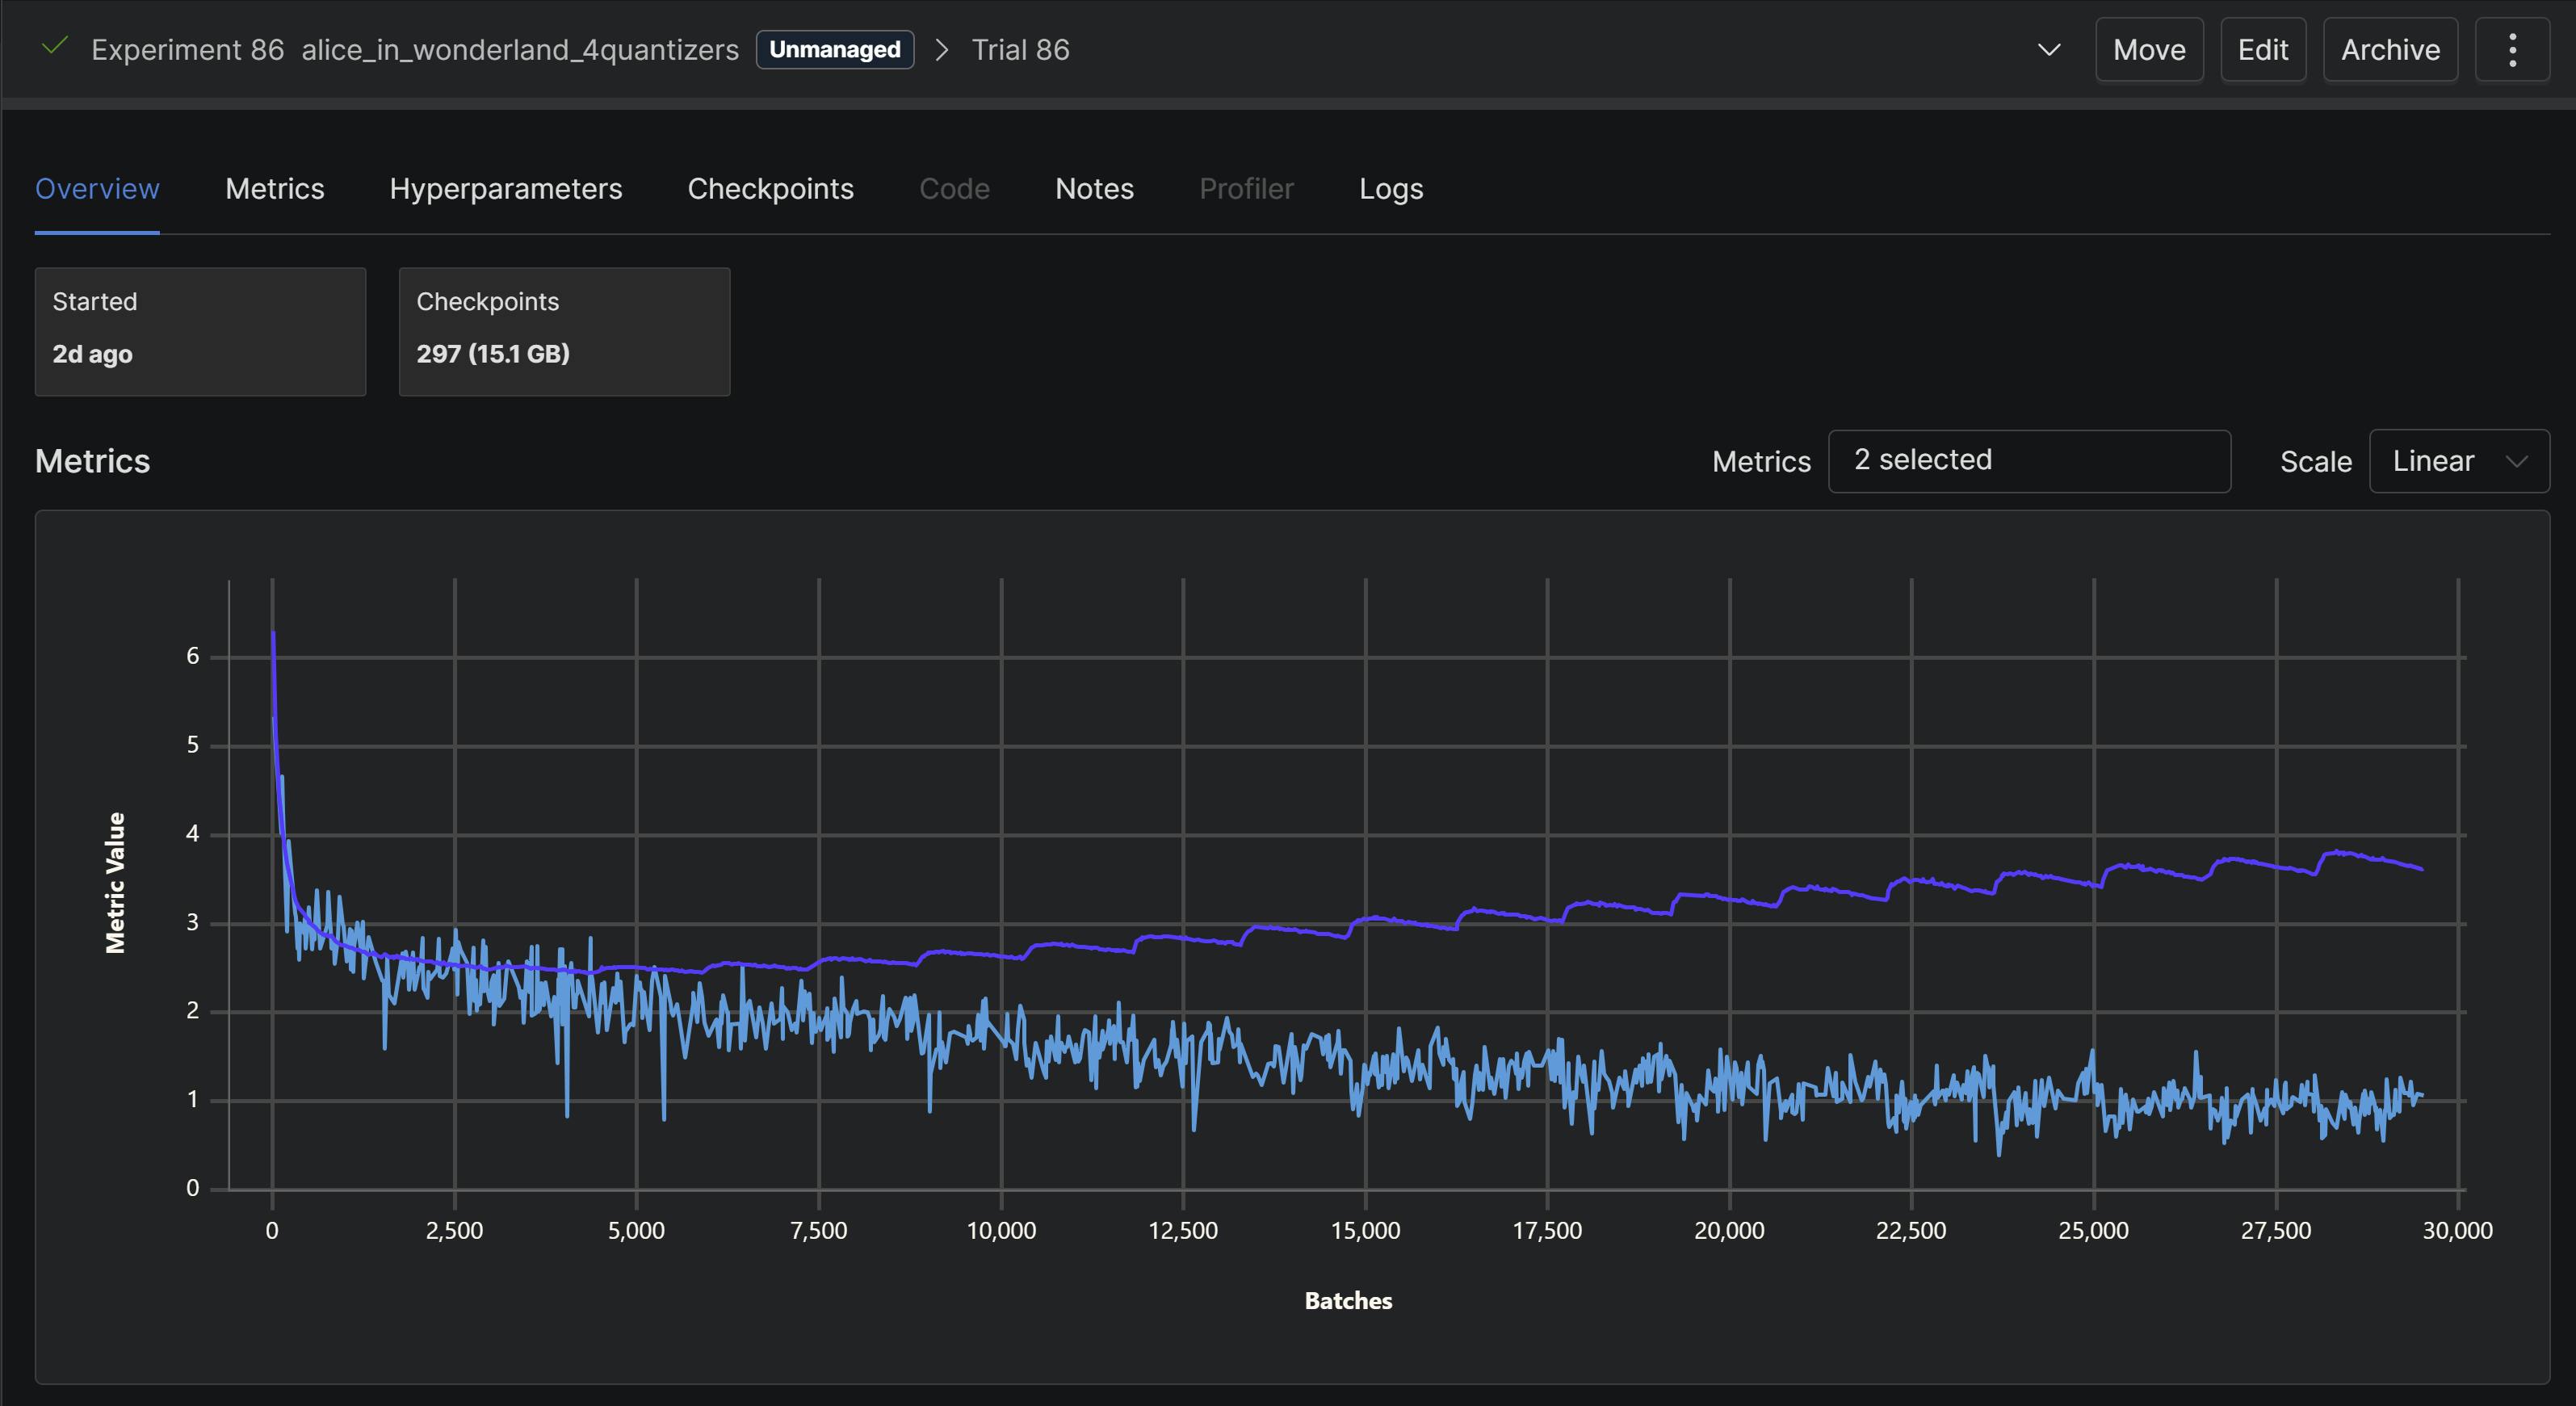
The 4 quantizer approach had the better output.
💡 By the way, these graphs were generated using Determined AI's Detached Mode, which allows you to stick a few lines of code in your training loop to have your experiment appear on the Determined web UI. I also ran all my experiments on a Determined AWS deployment (although this code can run locally too!).
Final thoughts
When training an audio model, it's convenient that you can check your tokenization by listening to the audio before training your model. Definitely do this! A poor tokenization will not result in quality outputs.
Data. Is. Important.
A good experiment tracking + visualization tool makes your life easier.
Reproducing open source code can be challenging - sometimes you need to rewrite code because certain libraries don't work as intended - but it's definitely worth it! You learn a lot in the process of building upon someone's work, and are usually able to achieve more than you could have when starting from scratch.
That's it! Feel free to try this example out for yourself and let me know what you think.
Follow me on Hashnode or my other socials, and join the Determined Slack Community to stay up to date!